We have our render pass, we also have our command buffer, and we have Vulkan itself initialized. It is time to actually begin writing the render loop itself.
Synchronization
Vulkan offers explicit sync structures to allow the CPU to sync execution of commands with the GPU. And also to control the order of executions in the GPU. All Vulkan commands that are executed will go into a queue and will be executed “non-stop”, and in an undefined order.
Some times, you explicitly want to make sure some operations have finished before executing new ones. While operations done to a given VkQueue happen linearly, if you have multiple queues, the order is not guaranteed. For that, and for the communication with the CPU, we have two structures
VkFence
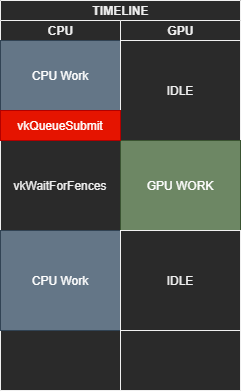
This is used for GPU -> CPU communication. A lot of Vulkan operations, such as vkQueueSubmit allow an optional fence parameter. If this is set, we can know from the CPU if the GPU has finished these operations. We will use it to sync the main loop in the CPU with the GPU.
Pseudocode example:
//we have a fence object created from somewhere
VkFence myFence;

//start some operation on the GPU
VkSomeOperation(whatever, myFence);

// block the CPU until the GPU operation finishes
VkWaitForFences(myFence);
//fences always have to be reset before they can be used again
VkResetFences(myFence);
VkSemaphore
This is used for GPU to GPU sync. Semaphores allow defining order of operations on GPU commands, and for them to run one after another. Some Vulkan operations (like VkQueueSubmit) support to either Signal or Wait semaphores.
If you set it to Signal a semaphore, this means the operation will immediately “lock” said semaphore when it executes, and unlock once it finishes execution.
If you set it to Wait on a semaphore, it means that the operation will wait until that semaphore is unlocked to begin execution.
Pseudocode example:
VkSemaphore Task1Semaphore;
VkSemaphore Task2Semaphore;

VkOperationInfo OpAlphaInfo;
// Operation Alpha will signal the semaphore 1
OpAlphaInfo.signalSemaphore = Task1Semaphore;

VkDoSomething(OpAlphaInfo);

VkOperationInfo OpBetaInfo;

// Operation Beta signals semaphore 2, and waits on semaphore 1
OpBetaInfo.signalSemaphore = Task2Semaphore;
OpBetaInfo.waitSemaphore = Task1Semaphore;

VkDoSomething(OpBetaInfo);

VkOperationInfo OpGammaInfo;
//Operation gamma waits on semaphore 2
OpGammaInfo.waitSemaphore = Task2Semaphore;

VkDoSomething(OpGammaInfo);
This code will do the 3 DoSomethings in strict order in the GPU. The execution order of the GPU-side commands will be Alpha->Beta->Gamma . Operation Beta will not start until Alpha has fully finished its execution.
If you don’t use semaphores in this case, the commands of the 3 operations might execute in parallel, interleaved with each other.
Render Loop
In the render loop, we are going to use a single fence to wait until the GPU has finished executing the render work. For now we aren’t going to do anything advanced, and we will just wait until the work we sent to the GPU is executed to start preparing the next frame. Later in the chapter 4 of the tutorial we will change this to allow the CPU to continue preparing the next frame while the GPU is busy with the submit.
When doing the render loop, we need to request an image from the swapchain. Requesting an image from the swapchain will block the CPU thread until the image is available. Using vsync-d modes will fully block the CPU, while other modes (like Mailbox) will return almost immediately.
We will begin the render loop by requesting the image, which will give us a integer image index. We then use this index with the Framebuffer array we made.
Then we reset the command buffer, and start rendering commands. Once rendering commands is finished, we submit them to the graphics queue, and then we Present the image we just rendered to the window by calling VkQueuePresent()
Let’s begin the code for the renderloop.
Next: Programming render loop