At the end of the chapter 5 of the tutorial, you have a VulkanEngine class that handles almost everything, and renders a few hardcoded objects. Going from that into a more serious engine needs refactoring to setup a different architecture. In this article ill be explaining the architectural and physical code changes done to it to make it more of a GAME engine instead of just a rendering engine.
New dependencies and change to EASTL
For this project, I went and moved to EASTL instead of using the STL containers. Main reason for EASTL is easier allocator overrides, and being able to enable bound-checking in release modes at a insignificant performance cost. As a bonus i also get handy data structures like fixed_vector or better hashmaps. The biggest downside of EASTL is that the dependencies you use will be using the normal STL, which means you now need to instantiate both eastl::vector templates and std::vector templates with their helper structures/traits, decreasing compile time overall. On a head to head test, i found EASTL to take about the same time to compile as normal STL.
Using EASTL allowed simpler override of the allocator, which I used to change the allocator to snmalloc. This is a modern cpp allocator with considerable speed, specially when dealing with multiple threads allocating at once. I benchmarked this allocator being more than twice faster than the default MSVC allocator on most of my usage patterns.
For profiling, I implemented Tracy. This is the best open source profiler of its kind, and it works by having the developed flag functions with ZoneScoped; macros and their variants. When you then connect the Tracy client to your running application, it will accurately measure the scopes you put the macros on. This lets you see exactly where your time is going every frame, and it does so across threads too. You can also hook your allocation overrides into Tracy and that lets it see the exact allocations too so that it can accurately track the memory usages of your application by exact callstack. All of this comes at a very low performance overhead, but you have to be watchful of RAM usage as all of this data can easily bloat RAM.
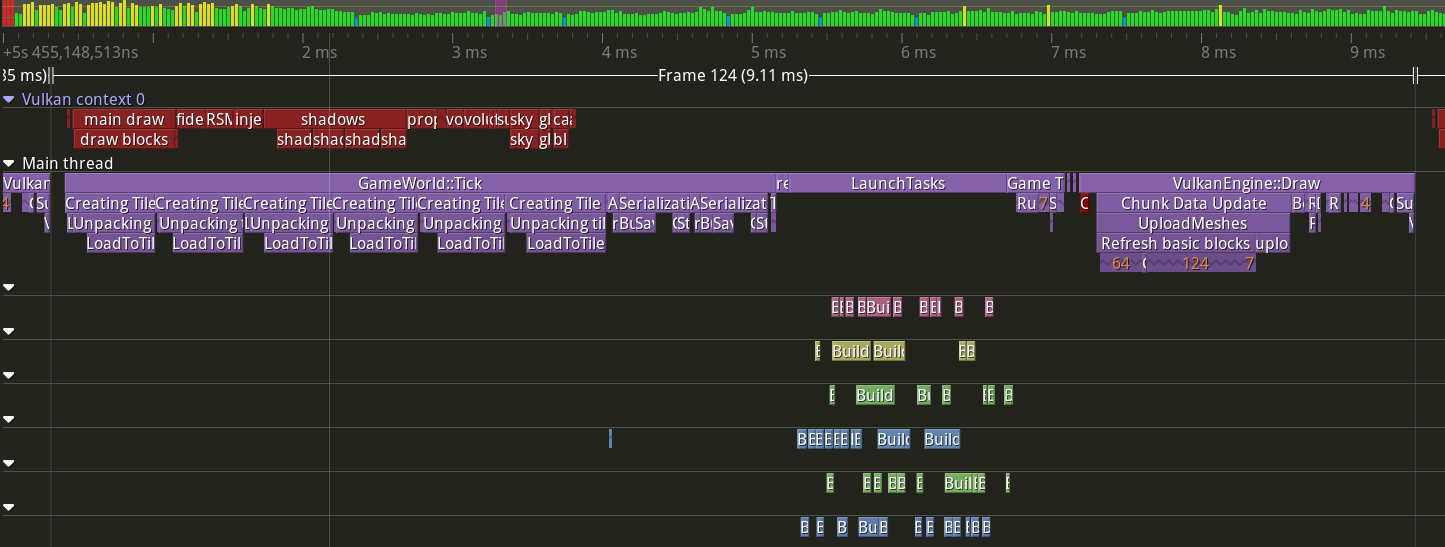 The top green bars are the frames of the capture, with green being below 16 ms frametime, and it getting worse in color as it grows. The
 VulkanContext row is the GPU timing of the frame (yes, Tracy can hook into vulkan!), while Main Thread row is my main frame loop. The other colored boxes represent worker threads doing some parts of world generation logic.
For physics, i added Jolt into the engine. Your main options lately for physics on a open source project is either Jolt or PhysX. PhysX is the more advanced option, but harder to embed. Jolt is easier to embed and has some very handy apis for multithread streaming of new physics objects, which is very handy for open world games. Jolt also has support for double-based coordinates while physx doesnt, which allows it to have very large maps with little problem. As this is a open world procedural RPG, large scale maps are the priority, which is why Jolt was the one used.
On particle systems, i needed something that had an editor to bootstrap some fancy effects until i can have my own system. I found Effekseer which is a japanese middleware used in a few different indie games. It contains a particle editor and then a runtime that can display those effects in the engine. The vulkan backend was mostly drop-in, but i had to modify it to make it work with Dynamic Rendering instead of renderpasses. Overall effekseer is very basic, with a feature set below the particle systems you find on engines like unity or unreal, but its good enough as a placeholder for now.
For sounds, i chose SoLoud, which is a fairly small audio library that handles some basic 3d audio and file playing. Its enough for the current stage of the project.
Flecs was selected as the ECS library to deal with game object management at the game layer. The renderer does not use it other than to update some structures from it.
Fastnoise2 is what is used for terrain generation. From my tests, this is the fastest noise generation library, and really hard to beat in performance. If used correctly, it can calculate noise graphs in a SIMD fashion in batches, which is a great fit to a voxel game where you might want to generate 8 x 8 x 8 voxel chunks at once.
Luau is used as scripting runtime for data management of game objects. Its not used as runtime, but as the game-object format as a replacement for json. This allows code to define new block types or items, which is handy. Its inspired by how Factorio does its data loading
Physical design for encapsulation and fast compile times
With so many new libraries, we need a way to encapsulate them to avoid a serious compile time explosion. For example, VulkanEngine class leaks the vulkan headers as its using vulkan types on its private parameters.
Inspired by modern CryEngine, on the big classes i encapsulate them behind a pure interface that becomes the “public API” of the class. This technique is one of the many ways you can do pImpl patterns, and helps a lot to reduce compile time bloat and improve the incremental building times. Some of these classes are created through static Create() function, others use a static Get() singleton pattern
// on a IFoo.h header, using forward declarations and having almost 0 transitive includes
class IFoo{
public:
    //virtual destructor, very important
    virtual ~IFoo() {};

    virtual void DoX() = 0;
    virtual bool IsWhatever() = 0;
}

//on a FooEngine.h or other header, private to a section of the codebase
class FooEngine final: public IFoo{

    void DoX() override;
    bool IsWhatever() override;
}
“Outside” users of this Foo class will always refer to it through the interface, while the Foo class is flagged as final so that the compiler can remove virtual calls internally. Other classes that are part of the same section as Foo will also be using the FooEngine class directly, skipping the virtual call overhead. When doing this, you reduce the amount of users of the FooEngine.h header, highly reducing the amount of files that need compiling when doing incremental edits. There are other ways of doing pimpl patterns, but this is a very simple one and works just fine.
Most of the 3rd party libraries are encapsulated in this pattern to avoid leaking their very heavy headers over the whole codebase, and isolating them from the rest of the engine. Effekseer in particular also had to be linked separately from the other code due to its compile flags. By having a virtual interface like this for communication its possible to keep things working even if the compile flags are a bit different. Note that every one of these interfaces have 1 implementation only. We are using this pattern for encapsulation, not to be able to swap things on different implementations.
Other important compile time boost was to setup precompiled headers. You can do that in CMake by doing target_precompile_headers(mytarget PUBLIC <target_pch.h>) . This will make cmake setup the precompiled headers automatically on your target_pch.h file, which should contain a list of your most used “external” headers, for example most of the STL and a few 3rd party libraries. You must be careful with exactly how many things you put on it, as having too many things can bloat the compile times instead of helping. The one on project ascendant contains the STL and EASTL containers, flecs.h, jolt.h, and fmtlib core.h.
Last thing we can do for compile times is enabling unity build. Modern cmake lets you setup unity builds automatically by using set_target_properties(gamelib PROPERTIES UNITY_BUILD ON) This will make CMake merge your .cpp files into a unity build, which can help with compile time. How much unity builds help depends on the CPU you use and the amount of cpp files you have. In this engine, i have tested it but found that it was only a minor help due to the decreased multithreading vs compiling each cpp file separately.
Shaders
The tutorial does GLSL, and compiles the shaders with a script in CMAKE. This has the problem that it has to recompile everything when you want to refresh, and it being a cmake target means you cant recompile the shaders while the game is running to setup shader reloading. Now, to compile shaders, there is a python buildshaders.py in the shaders folder of the engine. This script checks the timestamp of a code file and compares it with the timestamp of the spirv file. If the spirv file is older than the source, then it compiles the shader. To deal with includes, there is a list of “core header” shader files where if they change, it recompiles everything. On a more advanced version of this, you would need to parse the include directives seen in the shaders, and do a smarter graph based rebuild.
To hot-reload shaders, all you need to do is create the pipelines again with the same builder as the tutorial (calling the init_pipelines functions again), and swap the VkPipeline handles of the materials and different shaders of the engine. I do this by pressing a key on the keyboard, which reloads every shader in the engine. This means that the shader editing loop is edit the shader in VSCode, run the buildshaders.py script, and alt-tab into the engine and press T which is the key i decided for reloading the shaders.
Shaders are also no longer GLSL, but SLANG instead. This lets me use both HLSL and GLSL syntax in the same project, which is very useful when grabbing math snippets from internet. You also get real pointers as a feature for use with buffer device address, which is used extensively across the engine. Building the slang shader is the same as GLSL, you just point the script into a different executable, and the vulkan SDK installs the slang compiler already. I highly recommend you swap to slang from GLSL as its a significantly better experience.
Snippets needed on the build script
import os
import subprocess

slangPath = "./../third_party/slang/bin/slangc.exe"
slangCommand = " {input} -o {output} -entry {entry} -force-glsl-scalar-layout -g2 -matrix-layout-column-major {defines} ";

# compare last timestamp of the files
def checkTiming(pathSource, pathTarget):
    try:
        info_source = os.stat(pathSource)
    except FileNotFoundError as e:
        return True

    try:
        info_target = os.stat(pathTarget)
    except FileNotFoundError as e:
        return True

    return (info_source.st_mtime > info_target.st_mtime)

# launches shader build on the target path
def buildShader(path, outputPath,entry ,defines):

    if(checkTiming(path,outputPath) or forceCompile):
        command = slangPath +slangCommand.format(input=path, output=outputPath,entry=entry, defines=defines)
        print("executing: " + command)
        subprocess.run(command, capture_output=True, text=True)


# compile files
buildShader("src/block_multi.slang","block_multi_transparent.frag.spv","pxMain", "-DFRAG -DTRANSPARENT")
buildShader("src/block_multi.slang","block_multi_slang.frag.spv","pxMain", "-DFRAG")
Renderer modularization
As more logic was added to the renderer, the new features were added as classes that then would be hooked to VulkanEngine, where the main render loop happens. Some of the new modules are the BlockRenderer class, which deals with gpu-driven voxel rendering, but also individual post-fx implementations, or the object-renderer that deals with meshes from the ECS. The VulkanEngine class remains the “core” of the renderer, holding the important handles like Device, and managing the frame loop itself.
To make this modularization work better, ive implemented a very simple framegraph to deal with sync across passes. It works as a sort of layer on top of the barrier system seen in the tutorial. It works by having you define passes every frame that runs, and then the system will run the passes in order, calculating which barriers are needed at each pass, and doing 1 pipeline barrier within the passes if thats necessary. If 2 passes dont need a barrier between them, then the system wont use barriers which will allow the GPU to overlap their work better.
The renderer has been moved from a forward renderer in the tutorial, to a deferred renderer. This was done because implementing techniques like SSAO requires a depth prepass, but doing depth prepass on a forward renderer means you draw 2 times, and a voxel renderer like this is completely bottlenecked by triangle counts, not materials. Thus moving to a deferred renderer makes sense because it does a single pass to write the gbuffer, and then it does the lighting logic in compute shaders.
GBuffer as seen in renderdoc. Due to the simplicity of the materials, its only doing Albedo (color) + Normals + Depth. I dont support roughness 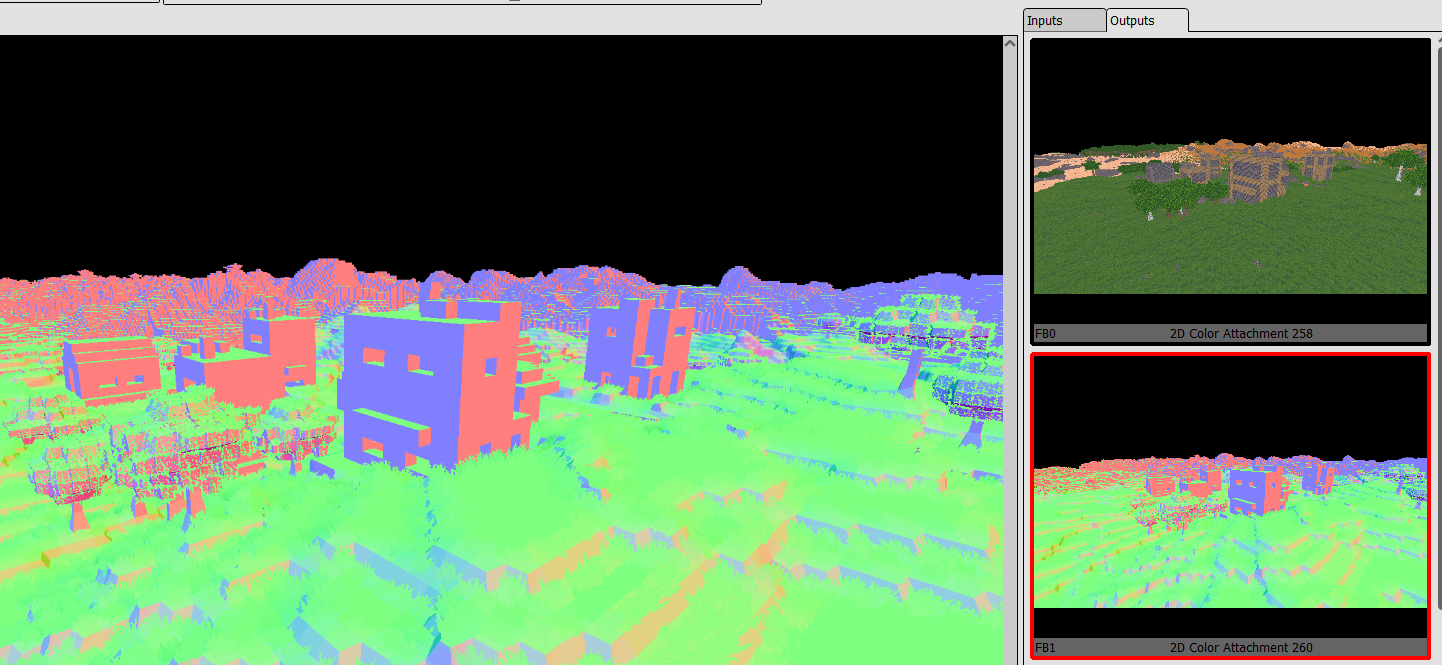
Mesh rendering is changed from the tutorial, moving into a retained system instead of walking a graph like the tutorial does. The logic is on a ObjectRenderer class, and it works by storing renderable objects in arrays, one array per mesh and material pair. When you create a mesh, it gives you a integer handle that then you can use to manipulate the mesh and move it, or to destroy it. When rendering a frame, it goes over each of these arrays, and does a single DrawInstanced call to draw that group of objects. There is no sorting needed as things are pre-sorted, and its not sorting by depth either. The system can render hundreds of thousands of meshes no problem, with the possibility of moving it towards indirect drawing later.
Animation is implemented using a custom buffer device address in the ObjectRenderer. There is no special renderer handling for skeletal meshes at all, they run through the same path as static meshes, but with a different shader. This means they are as fast to render as non-skeletal objects. Animation is handled in a component on the ECS entities, where i hold a SoA layout bone array and update it based on time. The animations are loaded from GLTF.
Voxels are drawn on the BlockRenderer class, and they are drawn using draw indirect for speed. They get drawn in chunks, with a chunk being 8x8x8 voxels. A chunk has multiple layers, for its transparency and opaque meshed draw, but also for its “far” render that is pure voxels. It generates a mesh for near voxels, while far voxels are drawn using a point-draw pipeline that is much faster and lighter in memory cost. It renders each individual voxel as a point, and in the pixel shader it raytraces the cube that makes that voxel.
Both the ObjectRenderer and BlockRenderer support shadow passes, and they are done with the same techniques as the main draw, but with different pipelines.
For data management, nothing is done. I just load the meshes exactly the same as the tutorial, preloading everything at startup. For games of this kind, the amount of assets they have is little, so you can preload everything at startup no problem and simplify the architecture by a lot. For voxel data and runtime meshes, i preallocate a 400 megabyte memory buffer and suballocate from it to handle the dynamic mesh loading needed for voxels.
The block textures are loaded from the block information from config files and stuffed into a single hardcoded atlas. Even a 2k by 2k pixel atlas is fine when your textures are 16 by 16 pixels.
Lighting is done as part of the ObjectRenderer, and applied during the GbufferApply compute pass, which does a lot of things at once and essentially calculates most of the rendering going from a gbuffer into a lit image. This pass calculates ambient light first, reading from the SSAO texture and LPV GI information, and then it loops over all the current lights in view and applies them to the current pixel. This is not very optimized, but as light counts in the prototype tend to be around 20 max, it performs completely fine and its very simple vs a clustered system. The lights get culled on the CPU to find which ones are near the camera and visible in the frustum, then put into a SSBO to read from the shader.
This is how the render target looks after applying lighting on the gbuffer. 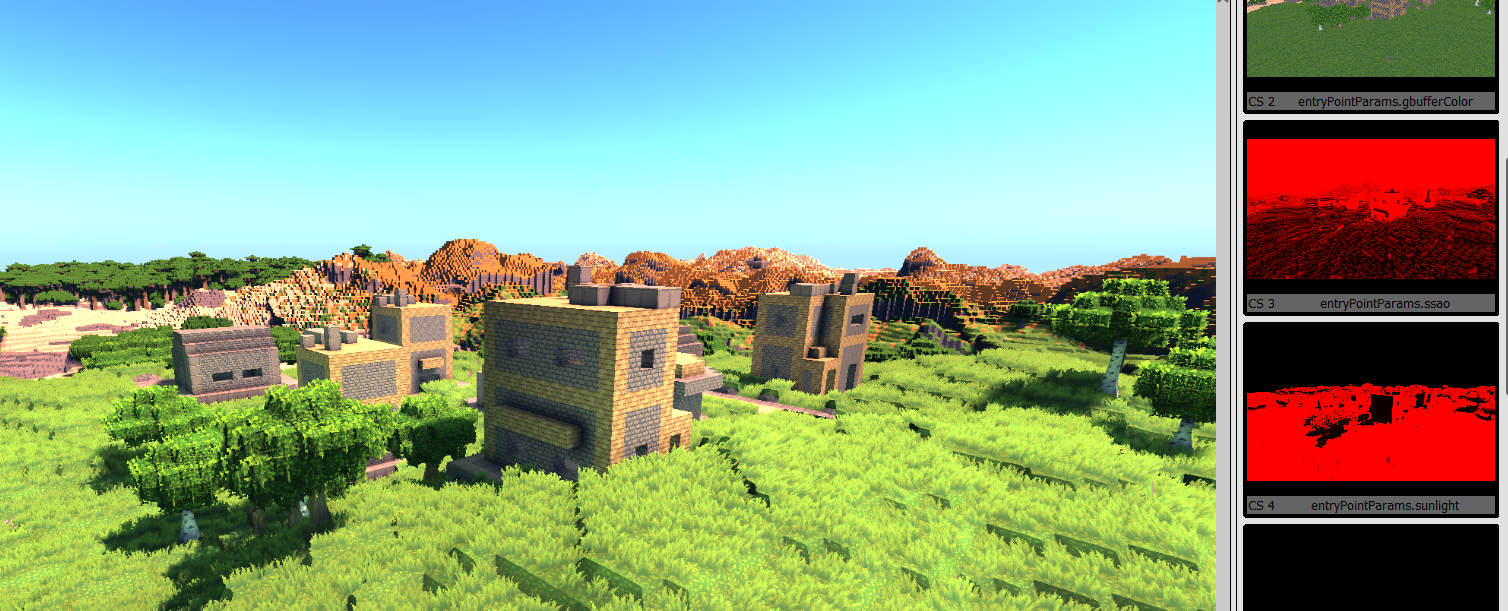
After lighting it applies volumetrics and fog on top on another shader, and renders the transparent objets. Next is bloom effect, tonemapping, and FXAA antialiasing. The last pass, which does tonemapping and fxaa, copies the image into the swapchain. Then it renders UI on top of that directly on the swapchain and presents.
Here is a picture demonstrating the fog system and the dynamic pointlights 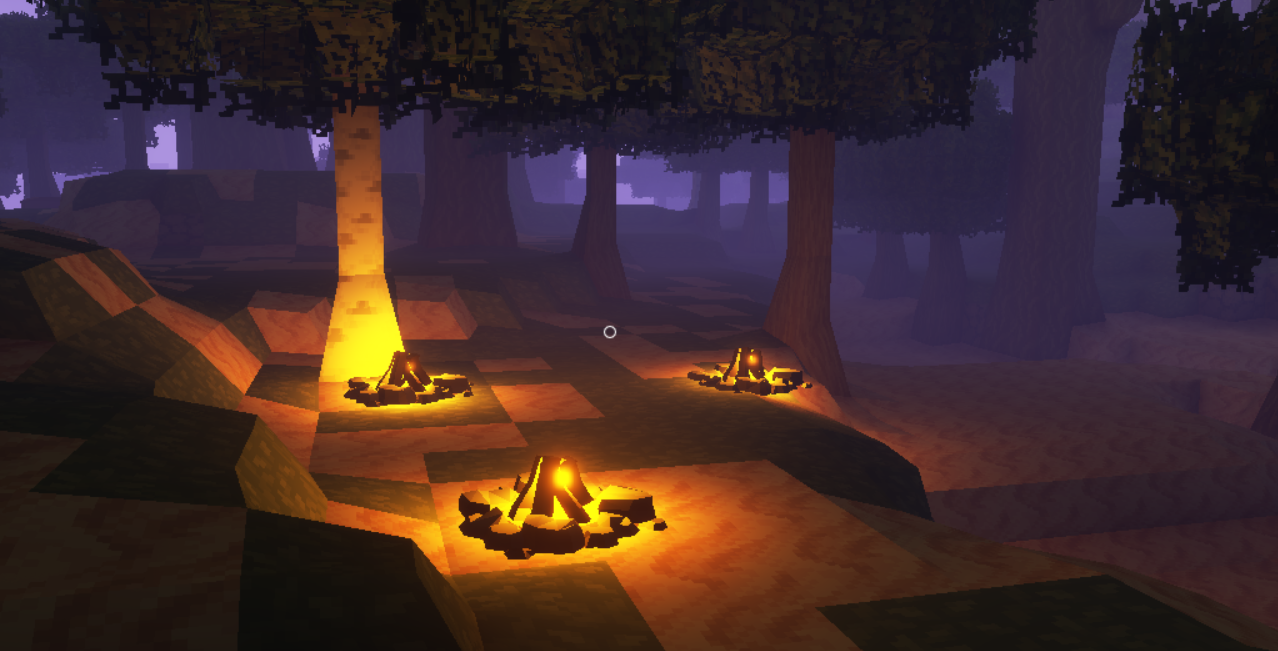
Details on the new renderer techniques and features will come on an article later.
ECS Game Layer
The renderer just draws things. We need something to hold the actual game state. For that, i use FLECS ECS library as the “low level” management layer. There is another game logic layer on top of that which manages entities, but that will be explained on a later article. The object renderer checks the ECS every frame and updates the mesh locations of the entities that moved since last frame. It also makes sure to remove and add new render meshes as entities with RenderMesh component get created or destroyed.
The ECS is also directly hooked into the Jolt physics, where it will sync game objects with their physics proxies inside Jolt, then run a Jolt simulation step, and then sync the new positions to the ECS objects.
There is a transform system for the ECS game objects, where there is a SceneNodeComponent, and by calling functions such as SetPosition on it, it wil automatically update all the children entities and flag them as moved to then be synced on physics and renderer. The transform system will be detailed on its own article later. The renderer does not care about hierarchy, it only deals with a simple list of entities with a MeshComponent.