Loading 3d models
Rendering triangles and parametric meshes is nice, but an engine loads 3d models made in dedicated programs. For that, we are going to implement basic OBJ format loading.
The OBJ format is a very simple format, which is understood by almost all software that deals with 3d models. We will be using the library tiny_obj_loader to load a Blender monkey mesh (on the assets folder) and render it.
The code that we have right now can render any arbitrary mesh as long as the vertices array is filled, and we can move that mesh in 3d space using the push-constants matrix.
We will begin by adding a new Mesh object to VulkanEngine class, to hold the newly loaded monkey mesh.
class VulkanEngine {
public:
//other code ....
Mesh _monkeyMesh;
}
Next, we are going to add a function to our Mesh object, to initialize it from an obj file.
struct Mesh {
	// other code .....

	bool load_from_obj(const char* filename);
};
//make sure that you are including the library
#include <tiny_obj_loader.h>
#include <iostream>
bool Mesh::load_from_obj(const char* filename)
{
    return false;
}
The OBJ format
In a OBJ file, the vertices are not stored together. Instead, it holds a separated arrays of positions, normals, UVs, and Colors, and then an array of faces that points to those. A given obj file also has multiple shapes, as it can hold multiple objects, each of them with separate materials. In this tutorial, we load a single obj file into a single mesh, and all of the obj shapes will get merged.
Let’s continue filling the load function
bool Mesh::load_from_obj(const char* filename)
{
    //attrib will contain the vertex arrays of the file
	tinyobj::attrib_t attrib;
    //shapes contains the info for each separate object in the file
	std::vector<tinyobj::shape_t> shapes;
    //materials contains the information about the material of each shape, but we won't use it.
    std::vector<tinyobj::material_t> materials;

    //error and warning output from the load function
	std::string warn;
	std::string err;

    //load the OBJ file
	tinyobj::LoadObj(&attrib, &shapes, &materials, &warn, &err, filename, nullptr);
    //make sure to output the warnings to the console, in case there are issues with the file
	if (!warn.empty()) {
		std::cout << "WARN: " << warn << std::endl;
	}
    //if we have any error, print it to the console, and break the mesh loading.
    //This happens if the file can't be found or is malformed
	if (!err.empty()) {
		std::cerr << err << std::endl;
		return false;
	}
}
With that code, we use the library to load an obj file into structures that we can use to convert into our mesh format. There are some structures we have to declare that the LoadObj function uses, and then we error check.
Continue with the load function, to put the meshes from the file into our vertex buffer
    // Loop over shapes
	for (size_t s = 0; s < shapes.size(); s++) {
		// Loop over faces(polygon)
		size_t index_offset = 0;
		for (size_t f = 0; f < shapes[s].mesh.num_face_vertices.size(); f++) {

            //hardcode loading to triangles
			int fv = 3;

			// Loop over vertices in the face.
			for (size_t v = 0; v < fv; v++) {
				// access to vertex
				tinyobj::index_t idx = shapes[s].mesh.indices[index_offset + v];

                //vertex position
				tinyobj::real_t vx = attrib.vertices[3 * idx.vertex_index + 0];
				tinyobj::real_t vy = attrib.vertices[3 * idx.vertex_index + 1];
				tinyobj::real_t vz = attrib.vertices[3 * idx.vertex_index + 2];
                //vertex normal
            	tinyobj::real_t nx = attrib.normals[3 * idx.normal_index + 0];
				tinyobj::real_t ny = attrib.normals[3 * idx.normal_index + 1];
				tinyobj::real_t nz = attrib.normals[3 * idx.normal_index + 2];

                //copy it into our vertex
				Vertex new_vert;
				new_vert.position.x = vx;
				new_vert.position.y = vy;
				new_vert.position.z = vz;

				new_vert.normal.x = nx;
				new_vert.normal.y = ny;
                new_vert.normal.z = nz;

                //we are setting the vertex color as the vertex normal. This is just for display purposes
                new_vert.color = new_vert.normal;


				_vertices.push_back(new_vert);
			}
			index_offset += fv;
		}
	}

    return true;
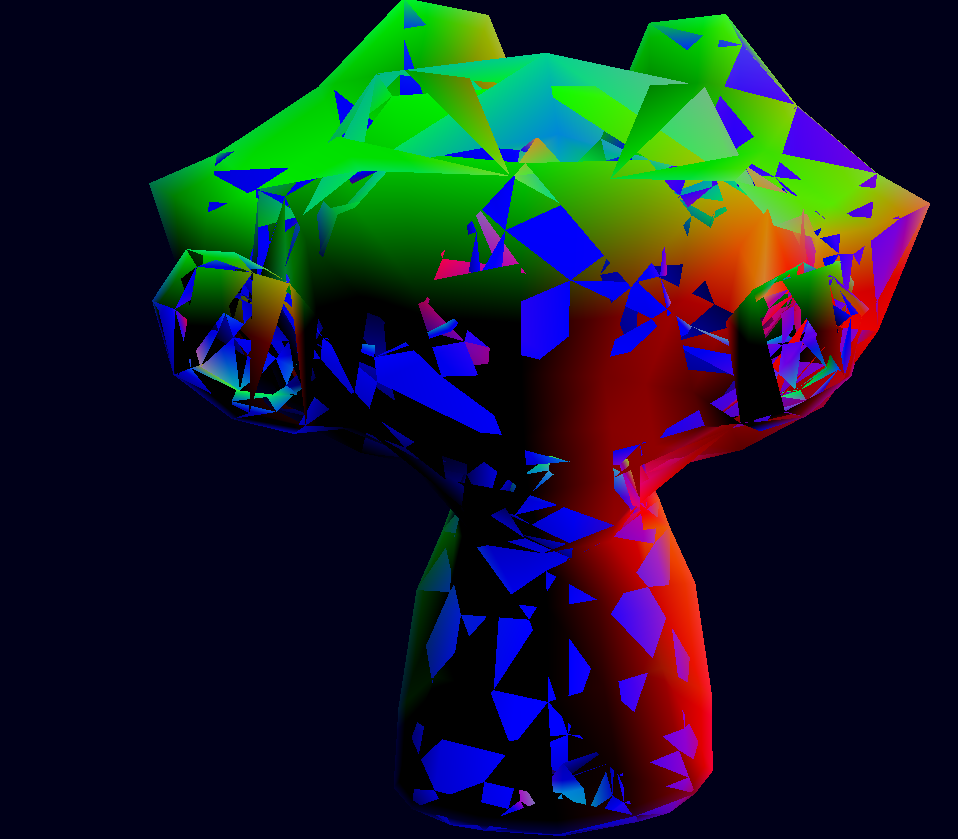
The TinyOBJ conversion loop can be quite tricky to get right. This one is derived from their sample code and simplified a bit. You can see the original at: https://github.com/tinyobjloader/tinyobjloader README page. In here, we are hardcoding the number of vertices per face to 3. If you use this code with a model that hasn’t been triangulated, you will have issues. Loading models that have faces with 4 or more vertices is something more complicated so we will leave it for other time.
With the code added, we can now load objs into our Mesh struct, so let’s load the monkey mesh into our triangle mesh, and see if something happens.
Loading the mesh
on the load_meshes function of VulkanEngine, we are going to load the monkey mesh alongside the triangle
void VulkanEngine::load_meshes()
{
	_triangleMesh._vertices.resize(3);

	_triangleMesh._vertices[0].position = { 1.f,1.f, 0.5f };
	_triangleMesh._vertices[1].position = { -1.f,1.f, 0.5f };
	_triangleMesh._vertices[2].position = { 0.f,-1.f, 0.5f };

	_triangleMesh._vertices[0].color = { 0.f,1.f, 0.0f }; //pure green
	_triangleMesh._vertices[1].color = { 0.f,1.f, 0.0f }; //pure green
	_triangleMesh._vertices[2].color = { 0.f,1.f, 0.0f }; //pure green

    //load the monkey
	_monkeyMesh.load_from_obj("../../assets/monkey_smooth.obj");

    //make sure both meshes are sent to the GPU
    upload_mesh(_triangleMesh);
	upload_mesh(_monkeyMesh);
}
The monkey mesh is now loaded, so we can use it in our draw loop to display it. It’s the same as the triangle, but we now use the monkey instead of the triangleMesh
 //bind the mesh vertex buffer with offset 0
	VkDeviceSize offset = 0;
    vkCmdBindVertexBuffers(cmd, 0, 1, &_monkeyMesh._vertexBuffer._buffer, &offset);

    //we can now draw the mesh
    vkCmdDraw(cmd, _monkeyMesh._vertices.size(), 1, 0, 0);
You should be seeing a rotating monkey head. But with a glitch, some faces draw on top of each other. That’s caused by the lack of a depth buffer that we have right now, so let’s fix that on the next article.
Next: Setting up Depth Buffer